Best Practices for Creating Engaging Video Lectures?
In today's digital era, the demand for dynamic and accessible educational content is at an all-time high. Traditional lectures are evolving, and presentations are no longer confined to the walls of a classroom or boardroom. But how do you transform your static slides into an engaging video lecture that captivates your audience? "How To Create Video Lectures with Your Presentations" is not just a guide; it's the bridge between your expertise and the interactive learning experience your audience craves. This blog post is your toolkit for bringing presentations to life, leveraging technology to enhance learning, and reaching your viewers wherever they may be.
Whether you're an educator aiming to enrich your students' learning experience or a corporate trainer looking to upgrade your training modules, the methods outlined in this guide cater to all. Have you considered the cutting-edge approach of using AI video generators, or are you more inclined towards the familiarity of PowerPoint? Perhaps you're curious about the versatility of screen recording software? Each method has its merits, and we'll explore them all. Beyond that, we'll compare AI Studios with traditional methods, providing you with additional tips and tricks to ensure your video lectures are not just informative, but also memorable. Let's embark on this journey of transformation and discover how to turn your presentations into compelling video lectures with ease.
Method 1: Using AI Video Generators
Creating engaging and informative lectures with your presentations is now more accessible than ever, thanks to the advanced capabilities of AI video generators like DeepBrain AI's AI Studios. This powerful platform streamlines the process of turning your presentations into captivating lectures, ensuring that your message is not only heard but also seen and remembered.
5-Step Process for Lecture Creation with AI Studios:
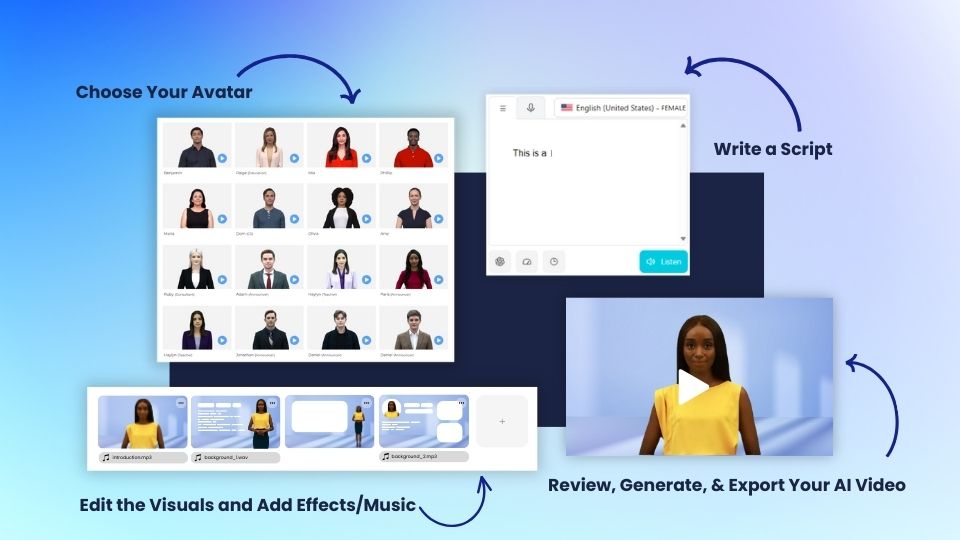
Step 1: Content Preparation
- Begin by gathering the materials you want to convey in your lecture. This could be PowerPoint slides, PDFs, or any text-based content. Make sure your information is accurate, up-to-date, and structured in a way that's conducive to learning.
Step 2: AI Avatar Selection
- Once your content is ready, log into AI Studios and select an AI avatar that best suits your lecture's tone and subject matter. With a diverse range of avatars to choose from, you can ensure that your presentation resonates with your intended audience.
Step 3: Video Customization
- With your avatar in place, it's time to customize your video. AI Studios offers a variety of animations, music tracks, and design elements to choose from. This step is your opportunity to infuse creativity into your lecture, making it more memorable and engaging.
Step 4: Rapid Video Generation
- After customizing your lecture, AI Studios will work its magic. The platform's AI Video Generator takes your content and avatar selections and crafts them into a seamless video. This process is not only quick but also ensures that the final product has a professional look and feel.
Step 5: Export and Distribution
- The final step is to export your newly created video lecture. AI Studios provides options for various video qualities and formats to suit different distribution needs. Whether you're sharing your lecture on an e-learning platform, social media, or directly with students, AI Studios makes it simple to get your content out there.
AI Studios transforms the traditionally complex and time-consuming task of video production into a quick and enjoyable experience. By following these five steps, educators and corporate trainers alike can produce high-quality video lectures that are both effective and captivating, all while saving valuable time and resources.
Method 2: Using PowerPoint
Microsoft PowerPoint is a popular tool for creating presentations, and it also offers features to record your screen and audio to turn your presentation into a video lecture.
Step 1: Prepare Your Presentation
Before recording, ensure your slides are ready:
- Check the content for accuracy and completeness.
- Add relevant images, animations, and transitions to make the slides more engaging.
Step 2: Set Up Your Recording
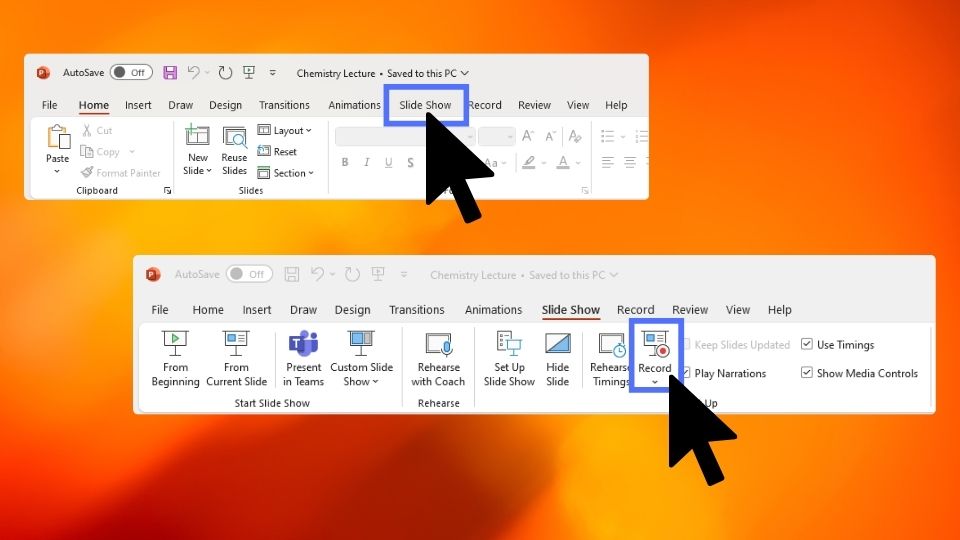
- Open your PowerPoint presentation.
- Click on the Slide Show tab
- Choose Record from the options.
Step 3: Record Your Lecture
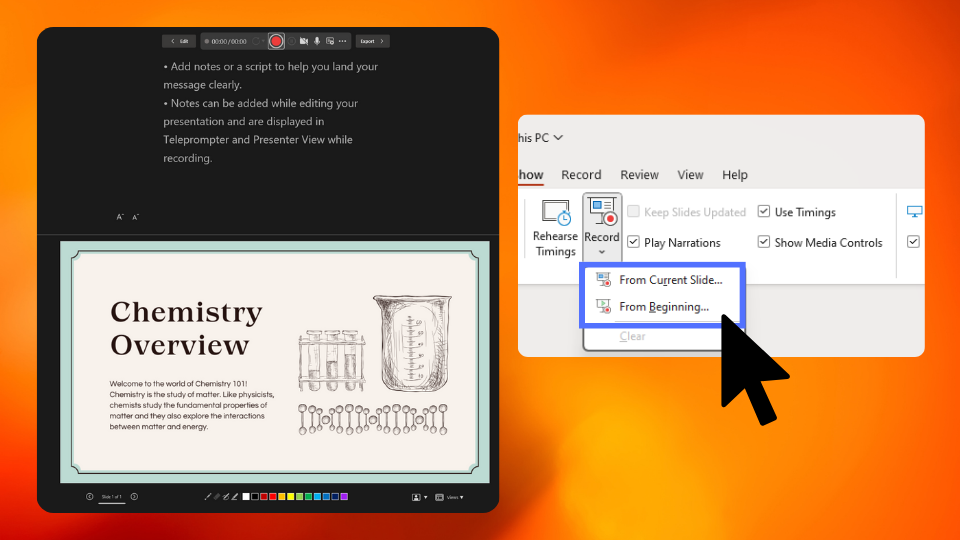
- Click on Start Recording from the beginning or from the current slide.
- PowerPoint will go into full-screen mode, and you can start speaking as you go through your slides.
- Use the in-built annotation tools to highlight or write on your slides during the lecture.
Step 4: Save Your Video
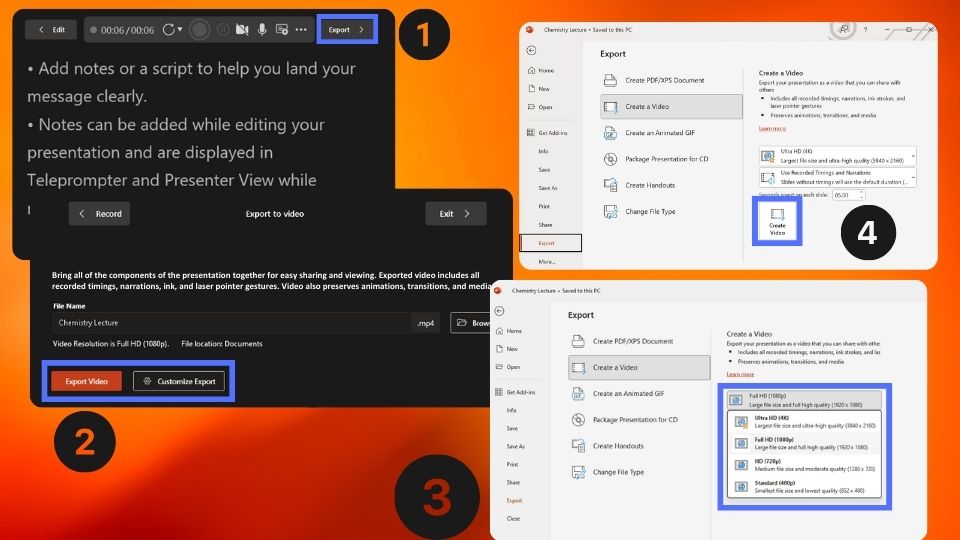
- Once you finish recording, press Stop Recording to exit the recording mode.
- Click on Export
- Name your recording as needed
- Choose Export Video or Customize Export to adjust the video quality.
- Select the video quality and click Create Video.
Step 5: Export and Share
- Choose a location to save your video file, give it a name, and click Save.
- Your video lecture is now ready to be shared on platforms like YouTube, Vimeo, or your website.
Method 3: Using Screen Recording Software
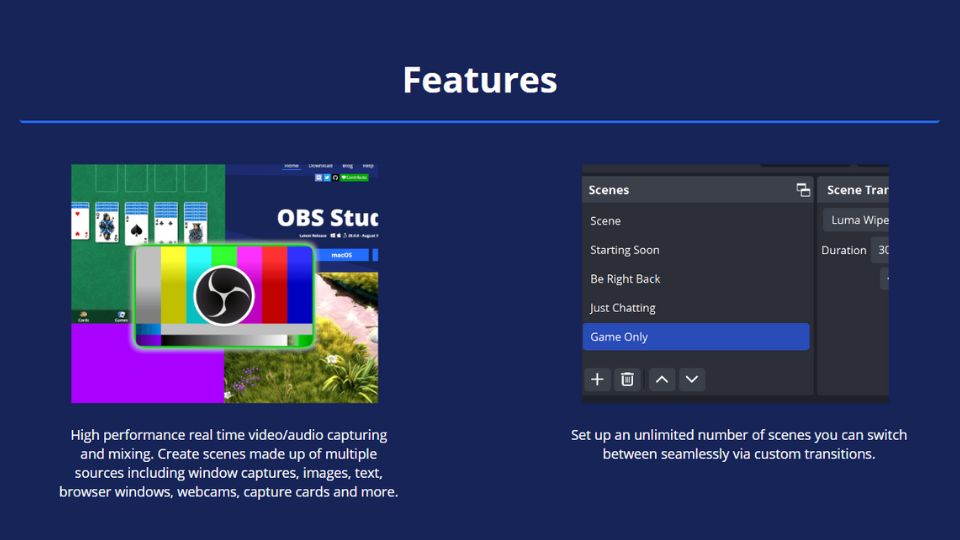
If you need more advanced features or want to include webcam footage, you can use screen recording software like OBS Studio, Camtasia, or Screencast-O-Matic.
Step 1: Set Up Your Software
- Download and install your chosen screen recording software.
- Configure the recording settings, such as the area of the screen to capture and audio sources.
- If you want to include webcam footage, make sure to set up your webcam in the software.
Step 2: Record Your Lecture
- Open your presentation and the screen recording software.
- Start the recording and switch to your presentation.
- Proceed through your slides while narrating.
Step 3: Edit Your Video
- Most screen recording software comes with editing features.
- Trim any unwanted parts, add effects, or insert additional media if needed.
Step 4: Export Your Lecture
- Once you're satisfied with the editing, export your video in the desired format.
- Name your file and choose a location to save it.
AI Studios vs Traditional Methods

Additional Tips and Tricks
Transform Presentations into Videos Easily?
Transforming your presentations into video lectures is a highly effective way to broaden your educational reach and provide a more dynamic learning experience. Whether you choose the advanced AI capabilities of AI Studios, the familiar interface of PowerPoint, or the robust features of screen recording software, each method offers unique benefits to suit your production style and audience needs. AI Studios, in particular, stands out for its ease of use, rapid content generation, and professional results, making it an ideal choice for those seeking efficiency without sacrificing quality. By following the comprehensive guide provided, you're well-equipped to create engaging video lectures that will captivate and educate your audience, no matter where they are. With these tools and techniques at your disposal, the process of video lecture creation is not only simplified but also more accessible than ever before.


