The Quick Print Screen Guide for Mac Users
In the digital age where sharing information is as common as a click or a tap, knowing how to take a screenshot on your Mac is essential. But are you aware of all the different ways to capture your screen? Whether it's grabbing an entire screen, a specific window, or just a portion, macOS has a variety of built-in functions to help you do just that. This blog post is a straightforward guide, aimed to equip you with the knowledge to use these tools effectively. We'll cut through the complexity and provide you with step-by-step instructions on how to print screen on a Mac—no matter the version of macOS you're running.
From using simple keyboard shortcuts to navigating third-party applications, we've got you covered. We'll also tackle some common issues you might encounter and offer troubleshooting tips to ensure you get the perfect screenshot every time. Ready to become a screenshot pro on your Mac? Let's get started with the basics and move on to more advanced techniques as we go along.
Method 1: Capture the Entire Screen
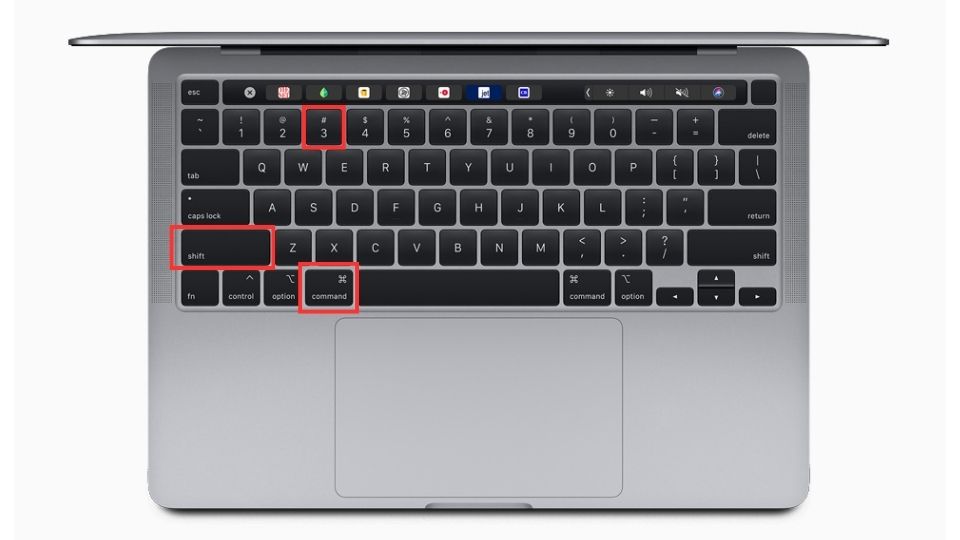
Capturing the entirety of your Mac's display is a straightforward process, ideal for documenting your full digital environment at a moment's notice. Whether you're creating a tutorial, saving a digital receipt, or preserving the layout of your workspace, this method ensures you don't miss a thing.
- Shortcut: Press Command + Shift + 3 together.
- You'll hear a camera shutter sound indicating that the screenshot has been taken. The file will be saved automatically to your desktop as a .png file, which is a high-quality image format that preserves the clarity of your screen capture.
This method is perfect for when you need a quick snapshot of your entire workspace or to share an error message that's taking up the whole screen.
Method 2: Capture a Selected Portion of the Screen
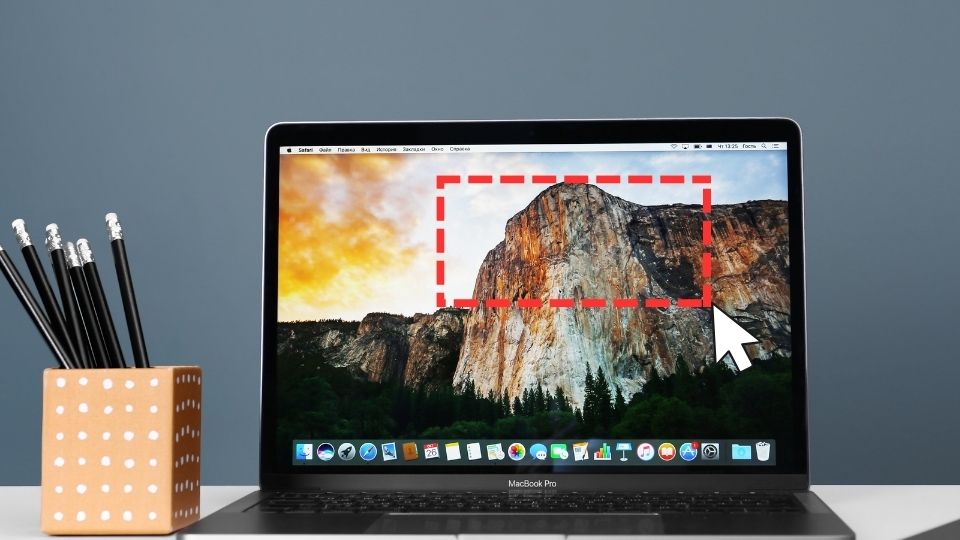
When you're focused on a particular detail and want to avoid the extra clutter, capturing a selected portion of your screen is the ideal approach. This method is particularly useful for instructional content, where highlighting a specific part of the interface is crucial, or when you want to maintain privacy by excluding sensitive information from your screenshot.
Both tools allow you to draw a selection box around the area of interest. The Screenshot app has the added advantage of letting you adjust the selection box before taking the shot.
Method 3: Capture a Specific Window
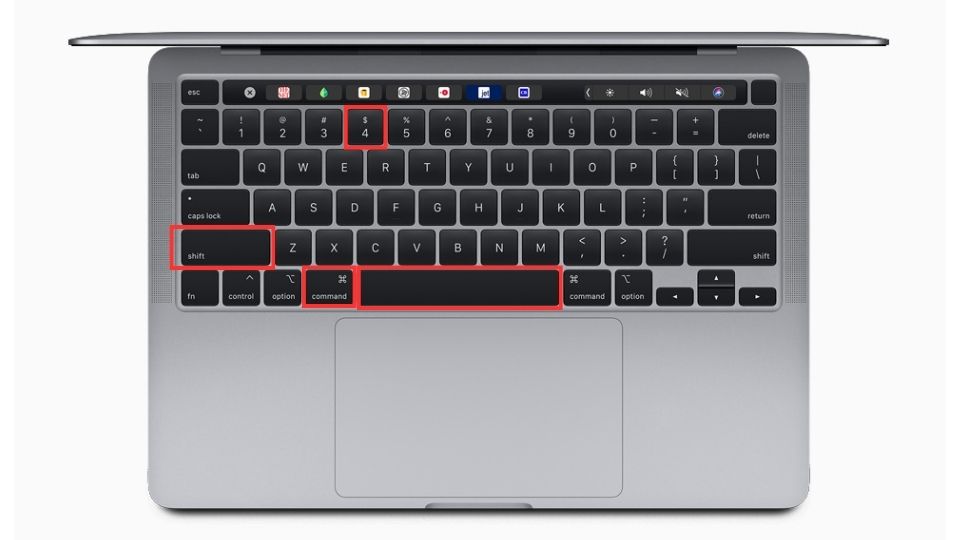
Targeting a specific application window is often necessary when you need to focus on a single element without the distraction of other windows or the desktop background. This is a common need for software reviews, technical support, and design-related tasks, where the context of a single window is more important than the entire screen.
- Shortcut: Press Command + Shift + 4, then immediately press the Spacebar. The cursor will change to a camera icon.
- Hover the camera icon over the window you want to capture. The window will be highlighted, clearly indicating what will be captured.
- Click to capture the highlighted window.
- The screenshot of the window will be saved to your desktop, cleanly capturing just the window itself, without any other part of the screen.
This method is particularly useful for app developers, designers, or anyone who needs to showcase an application without extra screen clutter.
Method 4: Capture a Menu
Menus often contain important options and commands that you may need to share or reference. Being able to capture a menu, whether it's a dropdown from the menu bar or a contextual menu that appears with a right-click, can be vital for user manuals, tutorials, or even to communicate with tech support.
- First, click the menu to reveal its contents.
- Press Command + Shift + 4, and then press the Spacebar if you want to capture the entire menu.
- Alternatively, you can click and drag to select the portion of the menu you wish to capture.
- Release the mouse or trackpad to take the screenshot, which will then be saved to your desktop.
This is particularly useful for creating how-to guides or documenting software bugs that only appear in specific menus.
Method 5: Using Grab Utility (Older macOS Versions)
For users who haven't upgraded to the latest macOS, or who prefer a more traditional approach to screen capturing, the Grab utility is an invaluable tool. It's particularly helpful for those who are more comfortable with menu-driven commands, or when you need to take timed screenshots, which can be useful for capturing actions that require a delay, such as opening a menu or activating a hover state in a website or application.
- Open Finder, navigate to Applications, then Utilities, and open Grab.
- From the Grab menu, choose the type of screenshot you wish to take: Selection, Window, Screen, or Timed Screen.
- Follow the on-screen instructions to capture your screenshot, which will then appear in a new window. You can save it manually from there.
Grab is a handy tool for users who prefer a menu-driven approach to screen capture and those who need timed screenshots.
Method 6: Third-Party Screenshot Tools

While macOS provides a robust set of tools for screen capturing, there are scenarios where third-party applications can offer a more tailored experience. These apps cater to users who need advanced editing capabilities, desire more flexibility in file formats, or require seamless integration with other software and cloud services for sharing and collaboration.
From intensive editing needs to quick sharing, each application caters to different aspects of the screen capturing experience.
Troubleshooting Tips and Common Issues

When taking screenshots on a Mac, you might occasionally run into some issues. Here are some common problems and their solutions to help you get back on track quickly:
Check Shortcut Keys
- Problem: Pressing the shortcut keys doesn't do anything.
- Solution: Go to System Preferences > Keyboard > Shortcuts and make sure all screenshot shortcuts are checked.
Screenshot Files Not Found
- Problem: You heard the shutter sound but can't find the screenshot.
- Solution: By default, macOS saves screenshots to the desktop. If they're not there, check other common locations such as Documents or Downloads folders. Spotlight search can also locate screenshots by typing in 'screenshot' and the capture date.
Screenshots Looking Too Dark
- Problem: Your screenshots are darker than expected.
- Solution: If your Mac is in Dark Mode, switch to Light Mode under System Preferences > General to see if it affects the screenshot brightness. Adjusting your monitor's brightness can also affect the outcome.
Screenshots Not Capturing the Right Screen Areas
- Problem: Selected area screenshots are coming out wrong.
- Solution: Make sure you're dragging the crosshair properly to cover the area you want to capture. For window captures, wait for the window to highlight before clicking.
Screenshots Capturing Multiple Monitors Unexpectedly
- Problem: Capturing the entire screen takes screenshots of all connected displays.
- Solution: If you only want to capture one display, use the Command + Shift + 4 + Space shortcut and select the desired screen with the camera icon.
By addressing these common issues, your screen capturing on Mac should be hassle-free and effective.
Additional Tips and Tricks
.jpeg)
Beyond the basic screenshot functionality, there are several lesser-known features and shortcuts that can enhance your Mac screenshot experience:
Copy to Clipboard
- Tip: Instantly copy a screenshot to the clipboard instead of saving it as a file.
- How: Hold the Control key while pressing any of the screenshot shortcuts. You can then paste it directly into a document or image editor.
Preview Editing
- Tip: Use Preview for more than just viewing PDFs and images; it's a powerful editing tool for screenshots too.
- How: Open your screenshot with Preview, and you'll find tools to crop, annotate, and even add shapes and text to your screenshots.
Instant Markup from Thumbnails
- Tip: Quickly markup your screenshot without opening another app.
- How: Click the floating thumbnail that appears in the corner of your screen after taking a screenshot. This will open the markup interface.
Silence the Screenshot Sound
- Tip: Take screenshots without the camera shutter sound effect.
- How: Put your Mac on mute before taking a screenshot to silence the sound, or use the Terminal command sudo nvram system.audio.volume=%80 to adjust the system volume level.
Change Default Save Location
- Tip: Customize where your screenshots are saved by default.
- How: Use the Screenshot app (Command + Shift + 5), click on 'Options,' and under 'Save to,' choose your preferred location.
With these additional techniques, you'll be well on your way to becoming a Mac screenshot expert, effortlessly capturing, editing, and managing your screenshots for any purpose.
Final Overview on Mac Screenshot Methods

This comprehensive guide has provided you with a thorough understanding of the various screenshot methods available on macOS, complete with strategies for addressing typical complications that may arise. By incorporating the additional insights offered, you can now streamline the screenshot-taking process, customizing it to your unique preferences for a more seamless experience.
Armed with this knowledge, you are ready to capture any element on your screen with confidence. The ability to quickly and effectively document and share your screen content is an invaluable skill in today's digital landscape, whether it's for capturing a memorable moment, creating a guide, or communicating ideas. Your newfound expertise in Mac screenshots will serve you well in all your endeavors.


