The Mac User's Quickstart to Screen Recording
Screen recording on a Mac—sounds straightforward, right? Yet, sometimes what should be a simple task can leave you scratching your head. Whether you're preparing a tutorial, documenting a bug, or just wanting to save a memorable video call, knowing how to efficiently capture your screen is a vital skill. This guide strips away the complexity and gets straight to the point: how do you record your screen on a Mac using the tools at your disposal?
Within this post, we'll walk you through several methods, from the quick access of the Screenshot Toolbar to the reliable features of QuickTime Player. We'll also touch on Preview and introduce some third-party software options for those looking for something more. And for the command line enthusiasts, we haven't forgotten you—there's a method for that too. Ready to get started? Let's jump right into the practical steps to screen recording success on your Mac.
Method 1: Using Screenshot Toolbar
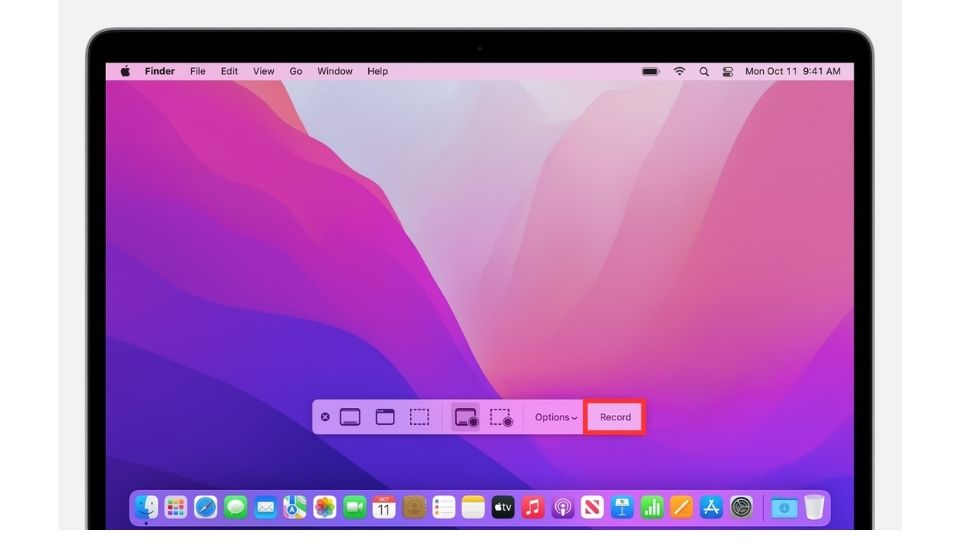
The Screenshot Toolbar is macOS's native screen recording utility, designed for quick and easy captures. It's accessible through a simple keyboard shortcut and provides options for recording the entire screen or just a selected portion. Here's a step-by-step guide to using the Screenshot Toolbar:
Troubleshooting Tips:
- Microphone Not Working: Go to System Preferences > Security & Privacy > Privacy > Microphone and ensure Screen Recording is allowed access.
- Storage Issues: If the recording stops or fails to save, check that your Mac has sufficient disk space.
- Unresponsive Toolbar: If the toolbar doesn't appear, restart your Mac and try the shortcut again.
- No Audio in Playback: Make sure you've selected the correct microphone in the options, and the input volume is adequate.
Method 2: Using QuickTime Player
QuickTime Player is a versatile tool for more than just media playback; it's also great for screen recording. It offers additional settings like microphone selection and quality adjustment. Here's how to use QuickTime Player for screen recording:
Troubleshooting Tips:
- QuickTime Won't Record: Ensure QuickTime Player has screen recording permissions under System Preferences > Security & Privacy > Privacy > Screen Recording.
- Audio Issues: If there's no sound, check the microphone settings in QuickTime and make sure the volume is up.
- File Not Saving: If you cannot save the recording, check if there's enough space on your Mac or try saving to an external drive.
- Recording Lag: Close unnecessary applications to free up system resources, and consider lowering the recording quality for a smoother experience.
Method 3: Using Preview

While Preview is primarily known for viewing images and PDFs, it also has the capability for screen captures, which can be particularly useful for creating slide-based tutorials or step-by-step guides. Here's how to use Preview for screen captures:
- Launch Preview:
- Open Preview from the Applications folder.
- Screen Capture Selection:
- Go to File > Take Screenshot in the Preview menu bar and select from the options to capture the entire screen, a window, or a selected portion.
- Capture the Screen:
- Follow the on-screen prompts; a countdown may appear before the screen is captured, depending on your selection.
Troubleshooting Tips:
- Unable to Capture: If you're having trouble capturing the screen using Preview, ensure that you have the correct permissions set under System Preferences > Security & Privacy > Privacy.
- Partial Captures: If you're only capturing part of the screen when you intended to capture the full screen, double-check that you've selected the correct option under the Take Screenshot menu.
- Delayed Response: Sometimes, Preview may take a moment to respond after taking a screenshot. If it seems unresponsive, wait a few seconds to see if the file appears on your desktop or in your designated folder.
Method 4: Third-Party Applications

For advanced features beyond what macOS offers, third-party applications are available. These can provide enhanced editing capabilities, live streaming, and more. Here's a quick comparison of some popular options:
These applications vary in price, editing capabilities, and additional features. OBS Studio is a popular choice for live streaming and is free, while ScreenFlow and Camtasia offer more advanced editing options for professional-grade videos. Snagit provides a balance between screen capturing and basic editing, and Capto is a more affordable option that still offers a range of editing tools.
Method 5: Using Screen Capture Command
For those who prefer the precision of the command line, macOS's Terminal offers the screencapture command, a quick and scriptable way to take screenshots and record screens. This method is particularly useful for users looking to incorporate screen captures into automated scripts or for those who need to trigger captures remotely. It's a straightforward process that can be customized with a variety of flags to capture exactly what you need. Here's how to use the screen capture command:
- Launch Terminal:
- Find Terminal in the Applications > Utilities folder or via Spotlight.
- Input Screen Capture Command:
- Type screencapture -x filename.png to take a screenshot of the entire screen, or add flags for more capture options.
- Locate the Screenshot:
- The screenshot will be saved with the specified filename in your current working directory.
Troubleshooting Tips:
- Syntax Errors: Check your command for correct syntax. Use man screencapture for a list of options and correct flag usage.
- Permissions: Make sure you have the right permissions to execute the command. You may need to run it with sudo for higher-level access.
- File Not Found: If you can't find the saved file, ensure you're looking in the correct directory. The file will be saved in the directory where the Terminal command was executed.
- Unsupported Flags: If you're using macOS Catalina or later, some flags may no longer be supported. Refer to the man page for updated flag options.
Additional Tips and Tricks
To complement the various screen recording methods available on a Mac, there are several additional practices that can elevate the quality of your recordings and enhance your overall experience. Here's a list of tips that you may find helpful:
- Keyboard Shortcuts: Learning and using keyboard shortcuts can significantly speed up your screen recording process on a Mac. For instance, Command + Shift + 5 brings up the Screenshot Toolbar, while Command + Control + Esc stops the recording. Familiarize yourself with these and other shortcuts to save time and streamline your workflow.
- Recording iOS Devices: If you need to record the screen of an iPhone or iPad, you can do so by connecting the device to your Mac with a USB cable. Once connected, open QuickTime Player on your Mac, go to File > New Movie Recording, and next to the record button, click the dropdown to select your connected iOS device as the source. This will allow you to record your mobile device's screen directly on your Mac.
- Editing: After recording your screen, you might want to edit the video to polish it before sharing. macOS offers iMovie, a free and user-friendly video editing application that allows you to cut clips, add transitions, and insert text. For more advanced editing needs, consider professional-grade software like Final Cut Pro or Adobe Premiere Pro.
- Use External Microphones: For clearer audio quality, consider using an external microphone instead of your Mac's built-in microphone. This can significantly improve the professionalism of tutorials or presentations.
- Record in Segments: If you're working on a lengthy recording, consider breaking it down into smaller segments. This makes it easier to manage your files and reduces the risk of losing significant portions of your work in the event of an unexpected interruption.
- Utilize Cloud Storage: To avoid taking up too much space on your Mac, you can save your recordings directly to cloud storage services like iCloud, Dropbox, or Google Drive. This also makes it easier to access and share your recordings from different devices.
Key Takeaways for Effective Screen Recording on Mac

Mac users have multiple screen recording tools at their disposal, including the Screenshot Toolbar, QuickTime Player, Preview, and various third-party applications, each offering distinct features and levels of control. For those preferring command-line operations, the screencapture command provides additional flexibility. To navigate potential hiccups, it's helpful to know the relevant troubleshooting steps for each method.
Enhancing your recording workflow can be as simple as mastering a few keyboard shortcuts, using an external microphone, and segmenting recordings. Opting to store files in the cloud can save disk space and facilitate easy sharing. With these efficient practices, achieving professional-grade screen recordings on your Mac can be both straightforward and effective.


