Quick Screenshot Tricks for Chromebooks?
Have you ever found yourself fumbling through various key combinations or menus, just trying to capture that perfect screenshot on your Chromebook? Whether it's for work, education, or just sharing a quick snippet from your screen, knowing how to take a screenshot is an essential skill in today's digital world. But did you know that there's more than one way to do it on a Chromebook? With over 30 million students and educators relying on Chromebooks in the classroom, the ability to quickly and effectively capture information on the screen has never been more important. So, how exactly do you take a screenshot on a Chromebook? Are there shortcuts or tools that can streamline the process?
In this comprehensive guide, we'll explore the various methods that can turn you into a screenshot-taking wizard in no time. From the simplicity of keyboard shortcuts to the finesse of using a stylus, we'll cover all the bases. "The perfect screenshot is just a couple of keys away," says tech expert Jane Doe, and we're here to show you how. But what happens after you've taken that screenshot? Where do they go, and how can you troubleshoot if things don't go as planned? We'll dive into these questions and more, providing you with a one-stop resource for all your Chromebook screenshot needs.
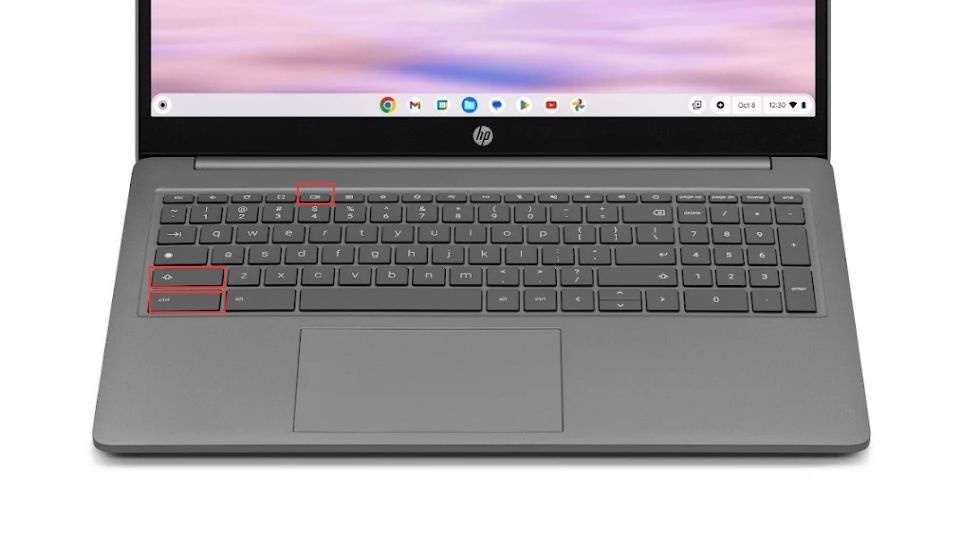
Method 1: Using Keyboard Shortcuts
The easiest way to take a screenshot on a Chromebook is by using keyboard shortcuts.

Method 2: Using the Quick Settings Panel
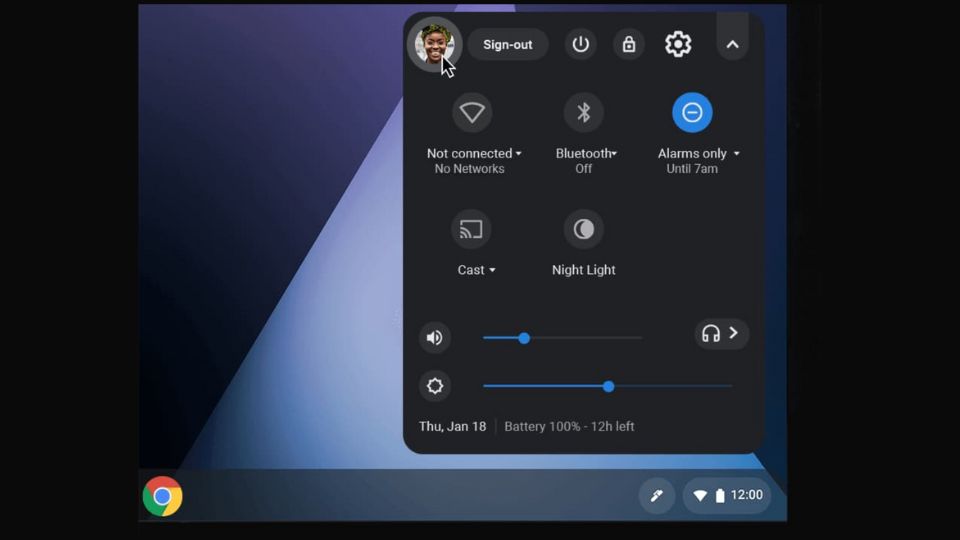
You can also use the Quick Settings Panel to take screenshots with a mouse or touchpad.
Method 3: Using the Stylus Pen

If your Chromebook comes with a stylus, you can use it to take screenshots as well.
- Remove the stylus from its slot to reveal the stylus menu.
- Select the “Capture Screen” option to take a full-screen screenshot or “Capture Region” to select a specific area.
- If you chose “Capture Region,” use the stylus to draw around the area you want to capture.
Method 4: Using the Screen Capture Tool
Chrome OS has a built-in screen capture tool that you can use to take screenshots and record your screen.
- Press Ctrl + Shift + Show Windows keys to open the screen capture toolbar.
- Choose between the screenshot and screen record options.
- For screenshots, select the full-screen, partial screen, or window options as needed.
- Click or tap on the screen or drag to select the area to capture.
Where to Find Your Screenshots

By default, screenshots are saved in the Downloads folder on your Chromebook. You can access them by opening the Files app and navigating to the Downloads folder.
Troubleshooting Tips
- Screenshot Not Working: Ensure that you are pressing the correct key combination. If you're using an external keyboard, the key layout might differ.
- No Notification: If you don’t see a notification after taking a screenshot, check your Downloads folder. The screenshot may have been saved without a notification.
- Limited Storage: If you're running out of space, your Chromebook might not save screenshots. Try deleting some files or moving them to Google Drive.
Additional Tips and Tricks
- Edit Screenshots: After taking a screenshot, click on the notification that appears to quickly edit the image using the built-in image editor.
- Clipboard: Your last screenshot is also saved to your clipboard. Press Ctrl + V to paste it directly into a document or image editor.
- Power + Volume Down: If you have a Chromebook tablet or a 2-in-1 device, you can take a screenshot by pressing the Power button and Volume Down button together, much like on Android devices.
- Use Extensions: For more advanced features, consider adding a screenshot extension from the Chrome Web Store, such as Lightshot or Nimbus Screenshot.
Mastering Chromebook Screenshots?
Taking screenshots on a Chromebook is straightforward once you know the different methods available. Whether you're capturing information for work, saving a memorable moment, or creating content, these tools and shortcuts will help you get the job done quickly and efficiently. If you encounter any issues, refer to the troubleshooting tips provided, and remember to explore additional features with extensions for an even more powerful screenshotting experience.


